How To Fix A Code 27 Air Bag Code on A Ford Truck
After installing a radio in my 2002 Ford F-250 I found that my air bag light came on. With the key in the ignition position; it flashes 2 times and then another 7 times, which was a code 27 for the air bag system. This code means that your passenger deactivation module is bad.
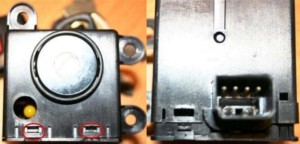
Since there is nothing that can really go wrong with this module, it’s actually the off lamp that has gone bad. A quick check can verify this, first the code flashing on your dash. The second is using your key to deactivate the passenger air bag should light the off lamp.
If it doesn’t light then follow my instructions and for about $2 dollar you can save yourself the expense of changing the entire module. The module F81B-14B268-AD lists for about $80 dollars so it worth the effort.
The air bag system goes thru a check of everything and if one little thing light a lamp is out, it deactivates the entire system and set a code. Since the lamp is actually a bulb with a filament it is really common to go bad. You cannot replace it with an LED, because there needs to be continuity across the leads. I’m sure you can put a diode in to show forward voltage, but let’s just fix the bulb with a bulb.
I used a Radio Shack 272-1154 Bi-Pin Lamp bulb as the replacement which is a 12v 50mA bulb. At 12 volts and 50 milliamps it generates 12x.05=.6 watts of energy. You can use a little bigger bulb like 60mA or 70mA; you just don’t want a really bright light on your dashboard. I choose the bulb because it had solid leads; the 272-1099 has wire leads. It’s a little smaller than the original, but it will work just fine.
Tools you’ll need:
- 5.5mm socket or 7/32” socket and ratchet
- Large flat tip screw driver
- Small flat tip jewelry screw driver
- Radio Shack 272-1154
- Soldering Iron and solder
- De-soldering sucker or soldering wick with flux
- Pair of small needle nose pliers
- About 1 hour of time
Step 1 – Removal of the dash board fascia – Use your flat tip screw driver to gently pry the dash board plastic from the dashboard. They use snap clips on mine, but you’re on your own as to how yours is held in place.
Step 2 – Removal of the module from the fascia – Unplug the module’s connector and put it to the side. Use your 7/32” socket or 5.5mm socket and remove the three bolts that hold it onto the dashboard fascia.
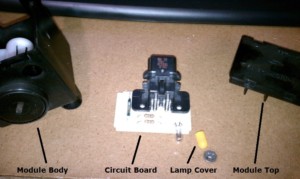
Step 3 – Disassembly of the module – Use your jewelry screw driver and pry the tabs on the front of the module; one by one. Then pry the tabs in the back of the module one by one. You will now have three pieces: the switch and body, the circuit board and the top of the module.


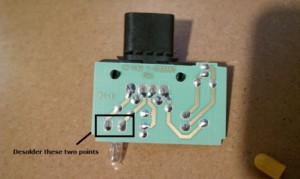
Step 4 – Desolder the bulb – You can either use your solder sucker or soldering wick with flux. I personally use desoldering wick, but there is a little talent to it. Remove the rubber yellow cover from the bulb, you will need to reinstall it on the new one.


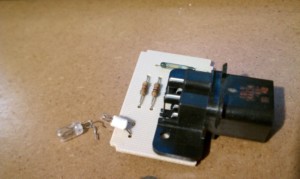
Step 5 – Solder the new bulb in – Use your needle nose pliers and bend the leads (without breaking them) so they fit into the circuit board. The bulb should have a right angle to the leads. Since the bulb cover is bigger than the bulb, just bend the bulb over to clinch the rubber cover. It’s not perfect but it works.

Step 6 – Test it – before you reassemble the module take it to the vehicle and plug it in. Turn the key to the ignition position and observe the light; both on the dash and the module.
Step 7 – Reassembly – If it is all back to normal put the module back together and reinstall the module into the dash.
You’re done, and if you found this article to be of help… Donate or visit some of my sponsers.
April 1st, 2012 at 7:50 pm
Your fix worked perfectly, Thanks for the help and the savings !!!!!!!!!!!!!!!!!
May 7th, 2012 at 10:51 pm
Fantastic! Worked great, saved me money and allows me to keep my man card!
October 5th, 2012 at 4:21 pm
This worked perfectly. I have very little experience with soldering and circuit boards but with a short how to video from Youtube on desoldering you saved me a lot of money.
A big thanks!
October 5th, 2012 at 4:58 pm
Tim… I’m glad the article helped, it saved me from buying an expensive Ford module for something that cost less than 5 dollars and time.
February 7th, 2013 at 4:29 pm
Thanks you the MAN!