How To Turn an old Xbox into an Xbox Media Center – Part 1
Error Resizing Image: error_loading_image
Original Image Path: "/home/.facades/bohack/bohack.com/wp-content/uploads/2008/12/xbmc-main.jpg"
File does not exist?
Error Resizing Image: error_loading_image
Original Image Path: "/home/.facades/bohack/bohack.com/wp-content/uploads/2008/12/lpc-on-motherboard.jpg"
File does not exist?
Error Resizing Image: error_loading_image
Original Image Path: "/home/.facades/bohack/bohack.com/wp-content/uploads/2008/12/duox2gs_overview.jpg"
File does not exist?
Error Resizing Image: error_loading_image
Original Image Path: "/home/.facades/bohack/bohack.com/wp-content/uploads/2008/12/xboxback.jpg"
File does not exist?
Error Resizing Image: error_loading_image
Original Image Path: "/home/.facades/bohack/bohack.com/wp-content/uploads/2008/12/xboxtop_screws.jpg"
File does not exist?
Error Resizing Image: error_loading_image
Original Image Path: "/home/.facades/bohack/bohack.com/wp-content/uploads/2008/12/xbox-internal-cable-disassembly.jpg"
File does not exist?
Error Resizing Image: error_loading_image
Original Image Path: "/home/.facades/bohack/bohack.com/wp-content/uploads/2008/12/which_encoder.jpg"
File does not exist?
Error Resizing Image: error_loading_image
Original Image Path: "/home/.facades/bohack/bohack.com/wp-content/uploads/2008/12/1011_mbscrews.jpg"
File does not exist?
Error Resizing Image: error_loading_image
Original Image Path: "/home/.facades/bohack/bohack.com/wp-content/uploads/2008/12/xbox-duox2-lpc-layout-and-pins.jpg"
File does not exist?
Error Resizing Image: error_loading_image
Original Image Path: "/home/.facades/bohack/bohack.com/wp-content/uploads/2008/12/motherboard-header-solder.jpg"
File does not exist?
Error Resizing Image: error_loading_image
Original Image Path: "/home/.facades/bohack/bohack.com/wp-content/uploads/2008/12/xbox-duo-x2-header-solder.jpg"
File does not exist?
Error Resizing Image: error_loading_image
Original Image Path: "/home/.facades/bohack/bohack.com/wp-content/uploads/2008/12/xbox-duo-x2-gs-modchip-layout.jpg"
File does not exist?
Error Resizing Image: error_loading_image
Original Image Path: "/home/.facades/bohack/bohack.com/wp-content/uploads/2008/12/xbox-d0-connection-point.jpg"
File does not exist?
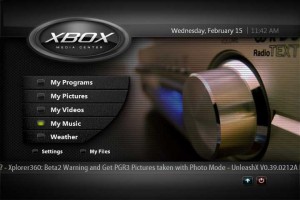
The original Xbox was released in November of 2001 by Microsoft and it created a new age of console gamers. Since the Xbox 360 came out the original Xbox has been thrown in the corner. However after 7 years this console still has a very important function for video junkies and ROM junkies. The Xbox Media Center is the ultimate use for the old Xbox console platform. The units can be purchased from GameStop for less than $50 dollars and for less than an hour of work plus a modchip, you too can have the ultimate media center. No other multimedia product can come close to the Xbox Media Center or XBMC.
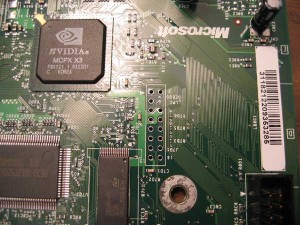
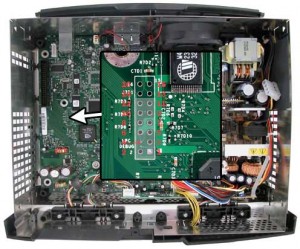
Microsoft never intended to have another operating system on the device; however they did intend to have a debugging and development platform connect for game development. So on the Xbox motherboard they left an unsoldered jumper pad that we will use to connect the modchip called the LPC header. The modchip’s function is a replacement BIOS for the Xbox. It will allow us to use an unlocked drive or bigger drive, a custom dashboard (replacement operating system), and customize the boot process thru an ini file.
You will need a few things:
Xbox (obviously)
Largest IDE drive you can get your hands on
Xbox Modchip (I tell you the best one)
Set of Torx screwdrivers (you need T10, T15 and T20 screwdrivers)
80 wire cable (optional, explained later)
25 Watt Soldering iron, flux, alcohol, low temp/thin solder
Small needle nose pliers
Small diagonal cutting/stripping pliers
A foot of very fine wire (28 or 30 AWG gauge wire)
A steady hand and patience
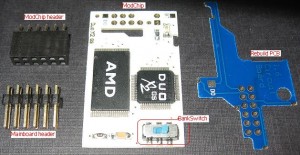
So the Xbox modchip I use was recommended by a friend, you can choose your own. The chip this article will focus on is a ‘DouX 2 GS’ chip with the Linux Cromwell flash loaded from the factory. The first one I purchased I had problems with; life isn’t perfect… You will need to gain some patience when working with the Xbox or any mod; this is your first lesson. This chip can be purchased from various vendors for $15 dollars or less, my advice is to check xbox-scene.com for the current preferred vendor. This chip is cheap, no frills, covers every version of Xbox and it also has dual BIOS so you can’t brick it. There are other chips out there that have a lot more features. You can decide yourself, but they all perform the same basic function of allowing a modified flash to be loaded so you can replace the Microsoft dashboard with the XBMC dashboard.
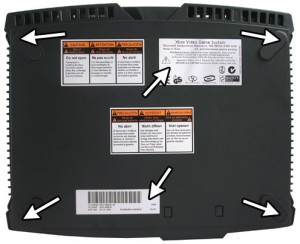
So after the modchip is purchased the next step is removing the motherboard from the unit. You will need a Torx 20 screwdriver; I would also recommend a box to sort your screws. Start by lifting the four sticky pads in each corner on the bottom of the unit. You will also find 2 screws under the silver patent sticker and under the barcode/date sticker. Now lift the top of the case off and set it to the side.
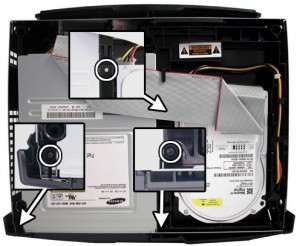
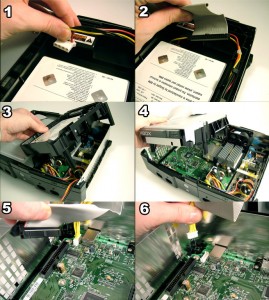
Next you will need a Torx 10 screwdriver. You will now take the 3 screws out that hold the DVD ROM and hard drive to the chassis. Unplug the hard drive power connector; you might need to use a flat tip screwdriver to gently pry it out as it sticks sometimes. Then gently unplug the hard drive IDE cable, be attentive to the cable connector as it can coming apart if you are not careful. Now remove the hard drive from the Xbox chassis and set it to the side for later. Remove the IDE cable from the rear of the DVD ROM drive as well as the DVD ROM power cable (yellow Jumper). Now the DVD ROM can be removed from the Xbox chassis; you may have to wiggle it out of the chassis. Set the DVD ROM to the side for later installation.
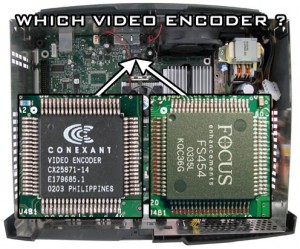
Now you have a clear view of the motherboard in the chassis. Now it is time to identify the version of Xbox you have. Basically v1.0 to v1.5 uses the “old†classification and v1.6 uses the “new†classification. The v1.6 BIOS is different and a v1.6 also requires a board soldered to the bottom of the motherboard. I’ve done both “old†and “new†and if you have a “old†Xbox then you have a lot less work, but don’t worry it’s not that hard if you do have a v1.6. This article will focus on the “old†Xbox as this is the majority of consoles out there. To identify the version of motherboard you will need to Google the terms “xbox version identificationâ€; xbox-scene.com has a great visual guide for identification. If you want a quick check: locate the video chip to the left of the fan and right above the first heat sink (from the left) and you can use the guide of: Conexant is v1.0,v1.1, v1.2, v1.3, Focus is v1.4, v1.5 and Xcalibur is v1.6. I would still recommend using the guide to check the exact version; this is the only standard way of verification. I also recommend that the check is done with the motherboard still in the chassis. Sometime there is a question of v1.4 vs. an older version and a continuity check is required; I prefer doing the check while the motherboard is in the chassis. You should always know your unit’s version number before the mod is preformed, so if you run into trouble you can talk intelligibly on forums.
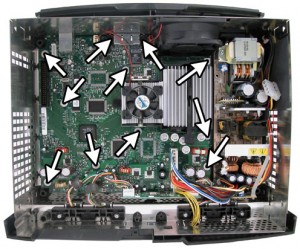
Now it is time to remove the motherboard. Remove the power connector and front panel connector on the right front of the motherboard and push them out of the way. I use a bread tie to keep them out of the way during the process of motherboard removal and installation. Next remove the game pad connector from the left front of the motherboard, again tying is out of the way is recommended. Lastly the fan connector on the rear of the motherboard needs to be removed; you may need to use a pair of needle nose pliers. I usually wedge this connector out of the way as it is in the rear of the board. Now you need a Torx 10 screwdriver to remove all 10 Torx screws, see the figure below. Once all the screws are removed, slide the motherboard forward and lift up on the front. Place it on an anti-static surface that you can stabilize the unit on, if you don’t use an anti-static surface you will suffer later. I have a large block of wood with a slot cut in it, so the motherboard stands on its edge, two of these and you can suspend the board. Move the chassis out of the way for later assembly.
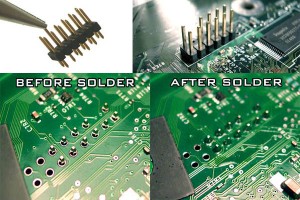
Now it is game on! Your soldering skills will come out now and also your frustration if you do it wrong. Use a pair of needle nose pliers and remove the #4 pin from the motherboard header (male end), see the diagram below. Apply some flux to the motherboard pads both sides and the header pins (short side), keep in mind that you will need to remove the flux later so a very thin coat is all you need. Install the header pins on the top of the motherboard, it should only fit one way. If the #4 pin is drilled then install the header pins closest to the front of the board leaving 4 pins open towards the back of the board. Now apply solder to the bottom and allow a liberal amount to flow through the hole, the trick is allowing the heat to do the work by preheating the board and pin slightly.
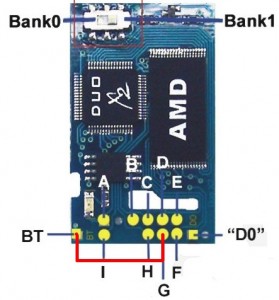
The next step is to solder the modchip header onto the modchip. Remove the #4 and #6 pins from the modchip header; you can also remove the #3 pin it basically does nothing. Now apply some flux to top and bottom of the modchip pads and the modchip header. Then solder it into place again preheating slightly to allow the solder to flow. Check the pictures to make sure you have the configuration and orientation proper.
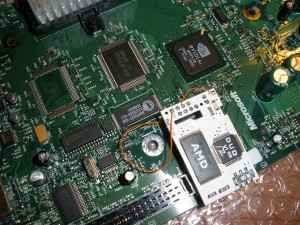
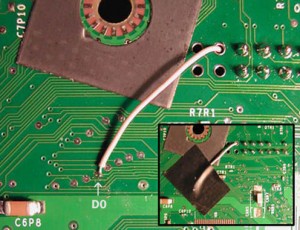
The last steps are to connect the BT and D0. The BT is a toggle for the mod, my recommendation is to connect BT to #10 pin or G pin with a small length of wire; this will keep the mod on all the time. The only reason you would want to toggle is if you play online with the Xbox. Apply flux to the BT pad and apply solder without the wire; this procedure is called tinning. Then make a length of wire and strip it on both ends. Now apply flux to the wire and solder it to the BT pad and the #10 pin. Now tin the D0 pad with some flux and solder. Make a wire that will be about 4 to 5 inches in length and strip both sides. Feed the wire through the #16 hole on the motherboard and flip the motherboard over. Now for the tricky part of soldering D0 on the very small solder pad. First locate the pad to be soldered to using the picture below and then mark it with a sharpie pen. The trick is tin the wire slightly then preheat the wire and attach it to D0 in one quick continuous action. Once that is done, flip the board and attach the other side to the D0 on the modchip after pushing the modchip onto the header pins on the motherboard.
Use a piece of paper towel and some alcohol to remove all of the flux from the motherboard and the modchip. Take time to clean it properly as the flux will act like a resistor over time across the bridged pads. Also apply a small piece of electrical tap to the D0 on the bottom of the board and route it away from the screw hole.
December 29th, 2008 at 10:30 pm
Just waiting for part 2 thanks
February 4th, 2009 at 11:34 pm
Soft modded my xbox in 15 minutes with no mod chip. Only had to by the action replay usb adapter for $15 on ebay. No opening the case!
March 10th, 2010 at 1:20 am
You have tested it and writing form your personal experience or you find some information online?